If you haven’t read about the bare essentials of running Java applications with Docker, you can find it here. In this post we’ll dive deeper into a few advanced concepts that need to be understood when dealing with docker application in a production environment.
Outline
Accessing application logs
By default, all files written by your application running inside a Docker container will be written to a writeable layer. As we’ve previously understood with layers, this is not good thing. This will increase the size of your container and make it hard to access. Another downside is the fact that this data will not be persisted once the container is stopped.
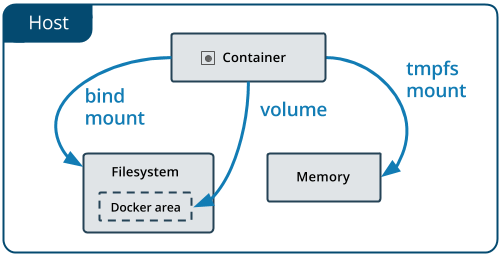
If there’s one thing you need to get right when running applications in production is good application logging. There will be times when logs are your only hope in reproducing or tracking down application issues. This makes it essential to have easily accessible log files. The two main approaches we’ll focus on today are bind mounts and volumes.
Bind Mounts
Using a bind mount is the simplest option available- it mounts a file or directory on the host system into the container. This is ideal during development, however in a production environment, some caution will need to be exercised. Using a bind mount will let you directly modify a file or directories on the host system, if used incorrectly it could have undesirable consequences.
To get started we’ll use our sample Spring Boot REST application from part 1. In order to log to a file I’ve added a logback configuration file.
1
2
3
4
5
6
7
8
9
10
11
12
13
14
15
16
17
18
<?xml version="1.0" encoding="utf-8" ?>
<configuration>
    <appender name="FILE" class="ch.qos.logback.core.FileAppender">
        <file>/tmp/app/testFile.log</file>
        <append>true</append>
        <!-- set immediateFlush to false for much higher logging throughput -->
        <immediateFlush>true</immediateFlush>
        <!-- encoders are assigned the type
             ch.qos.logback.classic.encoder.PatternLayoutEncoder by default -->
        <encoder>
            <pattern>%-4relative [%thread] %-5level %logger{35} - %msg%n</pattern>
        </encoder>
    </appender>

    <root level="DEBUG">
        <appender-ref ref="FILE" />
    </root>
</configuration>
This will redirect all log statements to /tmp/app/testFile.log within the container. We will then mount a folder on the host OS in order to view the log file.
We’ll use the --mount flag since the latest Docker document recommends using over the older -v flag. It’s also a lot more verbose and easier to understand.
Note: Unlike the -v flag --mount will not create a directory if it doesn’t exist on the host system and will throw an exception. Hence when using the --mount option you need to ensure that the path on the host exists.
1
2
3
4
5
6
7
8
# Build New Container with Tag vlogs
docker build -t oliver/restapplogs:vlogs .

# Run Container with --mount flag
docker run \
--mount type=bind,source=/tmp/docker/logs/,target=/tmp/app/ \
--name restapp \
--publish 8080:8080 oliver/restapplogs:vlogs
Now you should be able to navigate to /tmp/docker/logs/ and view the log file.
You can also use the docker inspect command and verify that everything is configured correctly by inspecting the Mount section.
Let’s run this for the container we’ve just run: docker inspect restapp
"Mounts": [
            {
                "Type": "bind",
                "Source": "/tmp/docker/logs",
                "Destination": "/tmp/app",
                "Mode": "",
                "RW": true,
                "Propagation": "rprivate"
            }
        ],
Volumes
Next, let’s explore Volumes. Volumes are managed by Docker and unlike bind mounts you cannot mount any file or directory. Here are some of the advantages of using volumes over bind mounts listed in the Docker documentation.
- Volumes are easier to back up or migrate than bind mounts.
- You can manage volumes using Docker CLI commands or the Docker API.
- Volumes work on both Linux and Windows containers.
- Volumes can be more safely shared among multiple containers.
- Volume drivers let you store volumes on remote hosts or cloud providers, to encrypt the contents of volumes, or to add other functionality.
- New volumes can have their content pre-populated by a container.
You may choose to create a volume independent of containers using the docker volume create <volume-name> command or create one on the fly when running the container. I’ll stick to the latter for now. Once again we’ll use the --mount flag albeit with slightly different options.
1
2
3
4
5
# Run Container with --mount flag
docker run \
--mount type=volume,source=rest-app-vol,target=/tmp/app/ \
--name restapp-volumes \
--publish 8080:8080 oliver/restapplogs:vlogs
Once the container has started, let’s check if the volume is created.
1
2
3
4
docker volume ls
# Output
DRIVER              VOLUME NAME
local               rest-app-vol
As you can see we have a volume named rest-app-vol, now let’s inspect the details of that volume.
1
2
3
4
5
6
7
8
9
10
11
12
13
docker volume inspect rest-app-vol
# Output
[
    {
        "CreatedAt": "2020-03-15T13:30:08Z",
        "Driver": "local",
        "Labels": null,
        "Mountpoint": "/var/lib/docker/volumes/rest-app-vol/_data",
        "Name": "rest-app-vol",
        "Options": null,
        "Scope": "local"
    }
]
Docker has mounted the folder /var/lib/docker/volumes/rest-app-vol/_data to the container. You may also inspect the container and look at the Mount section as we did in the previous part.
Note: If you are running Docker for Mac as I am, you will not find anything at this location. This is because Docker for Mac runs within a VM. In order to get to the volume you’ll have to run the following command.
1
screen ~/Library/Containers/com.docker.docker/Data/vms/0/tty
Now you are inside the VM and should be able to navigate to to /var/lib/docker/volumes/rest-app-vol/_data. On a side note, since you are starting a screen I’d highly recommend you learn the basics of using screen.
Understanding memory and CPU limits
By default, your docker containers will try and use as much resource as is available on the host system. It’s essential to understand that your docker container is sharing host system resources and you need to configure limits in order to achieve consistent behavior.
As described in the documentation, if left unchecked, it is possible for your container to consume too much memory and leave nothing for the host system. As a result the host will start killing processes in an attempt to free up memory. This could cause your container to be abruptly terminated.
Here are a few things to consider:
- How much CPU / memory does your application require?
- How many containers will be run on the same host?
- What is the effect of using Swap memory on your application? Should it be limited?
At minimum, assuming you are running only one container per host, I’d recommend setting the --memory and --cpus=<value> to around 70% of the total capacity of the host system.
Note: If you are running Java applications with Docker, especially Java 8, there are a few problems you need to be aware of. Here is a good writeup with possible solutions for the issues. In short, Java tends to ignore the resource limits set by Docker and tries to use all the resources available on the host, this causes Docker to kill the Java process abruptly.
Monitoring your Docker Container
Let’s look at all the options available out of the box, so to speak, to monitor your Docker container. Third party tools like Prometheus for monitoring is beyond the scope of this post.
Let’s run our container with the --name switch so that it’s easy to refer to it.
1
2
3
4
5
# Run Container with --mount flag
docker run \
--mount type=volume,source=rest-app-vol,target=/tmp/app/ \
--name restapp-volumes \
--publish 8080:8080 oliver/restapplogs:vlogs
Check console output
Everything that you application writes to standard output may be viewed using the following command.
1
2
3
4
5
6
7
8
9
10
# Command
docker logs restapp-volumes
# Output
  .   ____          _            __ _ _
 /\\ / ___'_ __ _ _(_)_ __  __ _ \ \ \ \
( ( )\___ | '_ | '_| | '_ \/ _` | \ \ \ \
 \\/  ___)| |_)| | | | | || (_| |  ) ) ) )
  '  |____| .__|_| |_|_| |_\__, | / / / /
 =========|_|==============|___/=/_/_/_/
 :: Spring Boot ::        (v2.2.2.RELEASE)
Check basic container statistics
Use this command to check the basic memory and CPU stats of your container.
1
2
3
4
5
# Command
docker stats restapp-volumes
# Output
CONTAINER ID        NAME                CPU %               MEM USAGE / LIMIT     MEM %               NET I/O             BLOCK I/O           PIDS
88d44f66e438        restapp-volumes     0.18%               202.5MiB / 1.943GiB   10.18%              2.29kB / 0B         37MB / 0B           33
Interactive shell within container
If you are comfortable with Linux and prefer monitoring your container within an interactive shell, execute the following.
1
docker exec -it restapp-volumes sh